
In the previous post I mentioned grabbing some video for a test clip. Here is a somewhat similar test clip I currently use. Use? Overuse! The clip is 3 minutes and 34.8 seconds long and I’ve watched bits of it hundreds of times. That’s because it is the quickest test of how well a DVD player’s (or TV’s) deinterlacing circuits work. In the image herewith, one full frame from this clip is at the top, while the three details are the valet’s waistcoat, unscaled.
The movie is the 1958 romantic comedy Gigi. That’s Maurice Chevalier at the left.
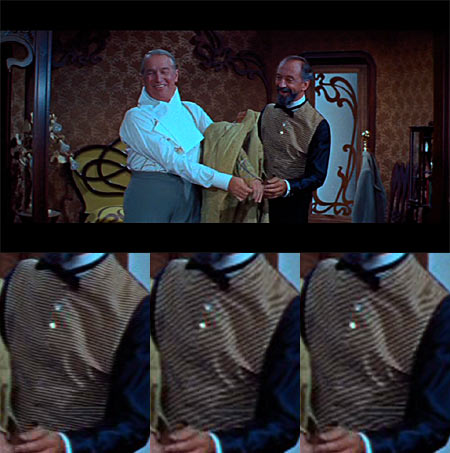
It is the waistcoat that is useful here. As you can see from the detail to the left, it has fine dark lines running horizontally over a yellowish background. The frames are progressive, but the PAL DVD has the video flagged as interlaced. This often leads to deinterlacing problems as I’ve previously explained.
The correct way to deinterlace this is simply to weave together the two fields to recreate the original frame. DVD players that do this produce a nice stable picture with full detail, such as that on the left. Some DVD players when doing a conversion to progressive scan, and some TVs when faced with 576i inputs, instead use a ‘bobbing’ deinterlacing technique. That means that instead of weaving together the two fields, they show one of the fields first (scaled up to full screen size and, if a decent quality circuit, with the original 288 horizontal picture lines filled with interpolated lines, created individually in each case from the original line above and the orginal line below it). Then the second field is shown, processed in the same way.
Often, this kind of processing is virtually unnoticable. But you can sometimes see a slight loss of picture sharpness, especially in stable parts of the picture. So more advanced deinterlacers combine weaving and bobbing. For the bits of the picture that aren’t moving, they perform a weave from the two fields, while those bits of the picture that are moving receive a bob. This is a remarkably effective way of doing it and can yield good picture results.
But if the source, like most movie DVDs, is progressive, this is still substandard. And this picture here shows why. This vest is moving. If it is treated as interlaced, rather than progressive, for the purposes of deinterlacing then instead of the fine horizontal lines, you get the course diagonal ones shown in the two details to the right. The middle detail is the same as the left detail, except that I deinterlaced it by discarding the even field and interpolating replacement scan lines. The right detail is also the same, except it was the odd field that was discarded. This I call a moire pattern because it is an artificially created pattern, generated by applying one kind of regular gridded filter to a gridded pattern. You can see, if you look closely, that the pattern differs slightly between the middle and right hand shots.
All this was artificially achieved using Photoshop. But I can assure you that these pictures are exactly what you see on screen when video-style deinterlacing is applied to this clip. But those course diagonal patterns roil around, moving to and fro, as though two sheets of a sheer curtain were blowing in a breeze.
Some clever deinterlacing circuits include a feature called ‘cadence detection’. They examine the content of the picture and attempt to determine whether the video is progressive or interlaced. This particular clip is very challenging, because those horizontal stripes can look a lot like interlaced combing, so virtually all cadence detecting circuits are tricked into thinking that this is interlaced, at least part of the time. That’s why I prefer circuits in which you can force film mode.